Mega
By David Frey
2023-10-01
This build was based off the Estes Der Mega Red Max kit originally created by Estes. I was fortunate enough to be able to purchase a 4-in nose cone and body tube, which were available from their website in September 2023. I secured a plywood upgrade kit from Rocketry Works. All the other parts I had or made via 3D Printer.
- Nose Cone - 4-in from Estes
- Body Tube - 4-in from Estes
- Fins/centering rings - Rocketry Works
- Motor Tube - 38mm from Apogee Components
- Motor Retainer - Scratch 3D Print in PLA+
- Decals - Scratch upscale from Der Red Max kit, by Estes. Some were custom-created such as kill card, Top Secret text, Frogglicker logo, and Succubus.
- Eybolt on forward Centering ring - 1/4-in
- Quicklinks - various
- Parachute - 43-in Top-Flite
- Fire Blanket - 24-in LOC blanket
- Recovery Harness - 1/2-in nylon webbing ~15 ft
- Epoxy - System Three, 15-min
- Fumed Silica added for fin fillets
- Rail guides - Scratch 3D printed in PLA+
- Camera Mount - Scratch 3D printed in PLA+
- Paint
- Primer: Rustoleum 2X sandable
- Black Gloss Rustoleum 2X
- Apple Red Gloss Rustoleum 2X
- The MMT was built by epoxying the forward and mid-centering rings in place and using the aft for alignment. The aft ring was then removed and the fins were epoxied with internal fillets and to the motor tube. The aft ring was later secured with epoxy
- The body tube originally had 3, 1/8-in slots cut but the upgrade kit required larger slots, so a cutting guide was designed and 3D printed to get the correct size
- A fin alignment jig was 3D printed and used to assist with alignment
- Epoxy was floated on the top of the forward centering ring and bottom of the aft ring where the 3D printed retaining ring was also epoxied
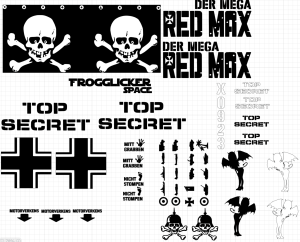
- All the decals were created using the Cricut Explorer 3.
- Most of the decals originated from the Der Red Max decal sheet, then converted to SVG, resized, and cut. Some were layered with black and white.
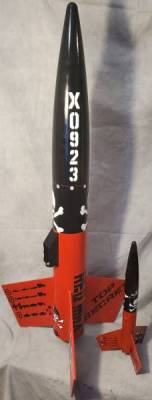
- The experimental number, 'X0923' represents my dad's birthdate. He was a huge aeronautics fan and supporter of my rocketry addiction. RIP, pops.
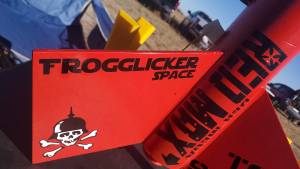
- A Frogglicker Space logo and my trademark succubus decal were also included
- The kill card on one of the fins was custom-recreated by obtaining silhouettes of various military vehicles similar to the original. There is one modern BMP easter egg to be found
- There is room on one fin for additional decals
- The camera mount is a modification of my 3-in camera mount, designed to house the RunCam2. It was epoxied onto the tube using System Three epoxy
- The rail guides are 3D printed, found on Printables, and tested previously using an 18-inch section of 10x10 rail.
- Once the rocket was completed and the stability was tested, the CG was found to be located on top of the CP. The maiden flight was delayed until a solution can be implemented to get the stability over 1 CAL.
10/01/2023:
- I have a path forward for the stability issue: I will be adding an ebay to the nose cone using a 3D-printed ring and sled/screw-in bulkhead originally designed by Inverted Pursuits Labs. I have made some modifications to accommodate an Eggtimer Quantum altimeter when I get my replacement built.
Stability Issue
2023-10-01
I have decided to cut the bottom of the nose cone off and fit the IPL ebay. This will also give me interior access to the nose cone to include a counterweight system. The top of the ebay sled has a hole for 1/4-20 all-thread that will allow me to capture weights above the ebay between two nuts. This makes the ebay weights adjustable in the event I wish to use a heavier motor/motor case. So crazy it just might work.
2023-10-01
Decals
2023-10-01
I created the decals by scanning the waterslide decal sheet from a standard Der Red Max kit. I converted this to SVG and imported it into Cricut Design Studio where I resized them (sort of) to scale. the black band around the forward end of the body tube and the squared-off crosses are spot on but the WWI skulls and other bits were a bit large. I created text similar to the Top Secret font. See the image below for a detail of the white and black. It is not obvious how to layer the two colors but most of the time I started with black and laid down the white on top since they were either cut to fit or the black was contiguous.
Post Launch Report
2023-10-22
Before giving the launch report, I wanted to mention that I was still tail-heavy. Even after adding the modified IPL nosecone avionics bay/sled. One of the mods I added was a 6mm hole at the very top of the sled. I cut a piece of all thread to size where it would fit into the tip of the nosecone. I then 3D printed three weights, 15g, 60g, and 120g for modifying and tuning the stability. I ended up using the 120g weight (which was just over 100g in reality). This brought my stability to 1.18 CAL.
The conditions were perfect for rockets. The weather was sunny, ~65 degrees F, with wind 2-4mph. I used an Estes altimeter since my Eggtime Quantum was lost in the Cookie Monster crash. I also employed the Jolly Logic Chute Release with a release altitude of 600ft. I added my onboard Runcam2 4k as well.
The launch was picture-perfect. When the rocket motor ignited, you could briefly see the green glare from the H250. It punched into the sky at ~ 90ft/sec up to an altitude of 1,068ft. The deployment was nominal as was the chute release. The rocket landed about 30m from the pad.
Highlights of the launch can be seen here: https://www.youtube.com/watch?v=-IoUA4amfvw
Sponsored Ads
![BENTOBEN for iPhone 13 Pro Max Phone Case,iPhone 13 Pro Max Magnetic Case [Compatible with MagSafe] Translucent Matte Shockproof Women Men Girl Protective Case Cover for iPhone 13 Pro Max 6.7", Red](https://m.media-amazon.com/images/I/41Sd1MeiIjL._SL500_.jpg "BENTOBEN for iPhone 13 Pro Max Phone Case,iPhone 13 Pro Max Magnetic Case [Compatible with MagSafe] Translucent Matte Shockproof Women Men Girl Protective Case Cover for iPhone 13 Pro Max 6.7\", Red")
![MOCCA Strong Magnetic for iPhone 13 Pro Max Case,[Compatible with Magsafe][Glass Screen Protector+Camera Lens Protector] Slim Thin Shockproof Cover Phone Case for iPhone 13 Pro Max 6.7", Red](https://m.media-amazon.com/images/I/41fk6jQH86L._SL500_.jpg "MOCCA Strong Magnetic for iPhone 13 Pro Max Case,[Compatible with Magsafe][Glass Screen Protector+Camera Lens Protector] Slim Thin Shockproof Cover Phone Case for iPhone 13 Pro Max 6.7\", Red")
![Vihibii for iPhone 15 Pro Max Case, [Compatible with Magsafe], Built-in Kickstand & Slide Camera Cover, Military-Grade Drop Protection Shockproof, Magnetic Phone Case for iPhone 15 Pro Max 6.7", Red](https://m.media-amazon.com/images/I/51QOE1Pa4-L._SL500_.jpg "Vihibii for iPhone 15 Pro Max Case, [Compatible with Magsafe], Built-in Kickstand & Slide Camera Cover, Military-Grade Drop Protection Shockproof, Magnetic Phone Case for iPhone 15 Pro Max 6.7\", Red")


![SuydanBox Magnetic for iPhone 13 Pro Max Case, Compatible with MagSafe, [Full Camera Protection][2 Screen Protectors] Silicone Shockproof Protective Phone Case for iPhone 13 Pro Max 6.7", Deep Red](https://m.media-amazon.com/images/I/41l0egq5aCL._SL500_.jpg "SuydanBox Magnetic for iPhone 13 Pro Max Case, Compatible with MagSafe, [Full Camera Protection][2 Screen Protectors] Silicone Shockproof Protective Phone Case for iPhone 13 Pro Max 6.7\", Deep Red")
![BENTOBEN for iPhone 15 Pro Max Phone Case,iPhone 15 Pro Max Magnetic Case [Compatible with MagSafe] Translucent Matte Slim Shockproof Women Men Protective Case Cover for iPhone 15 Pro Max 6.7",Red](https://m.media-amazon.com/images/I/41AmGLasF7L._SL500_.jpg "BENTOBEN for iPhone 15 Pro Max Phone Case,iPhone 15 Pro Max Magnetic Case [Compatible with MagSafe] Translucent Matte Slim Shockproof Women Men Protective Case Cover for iPhone 15 Pro Max 6.7\",Red")
 & Slide Lens Protective Cover & Kickstand & Raised Edges Protect Screen, Shockproof Rugged Case for iPhone 15 Pro Max 6.7\", Red")


 |
 |