Welcome
Welcome to RocketReviews.com (formerly EMRR).
RocketReviews.com is the home of almost 5000 reviews of rocketry kits and products. Written by visitors to RocketReviews.com like you, the reviews cover everything from low-power model rocket kits to high-power rocket motors.
The site's Flight Log allows you to record and share your rockets and their flights. The Builds feature helps you document your rocketry projects.
At RocketReviews.com, you'll also find a large collection of rocketry resources such as a list of rocketry clubs, and large libraries of OpenRocket design files and Rocksim design files. A number of rocketry tools and calculators are available to help you design, build, and fly your rockets.
As you explore RocketReviews.com, you'll also find a number of fun things such as a huge library of rocketry videos and a collection of photo albums.
 |
 |
Featured Review
LOC/Precision Lil' Nuke to Red Max
Manufacturer: Scratch

Contributed by Tony Fragge
(by Tony Fragge)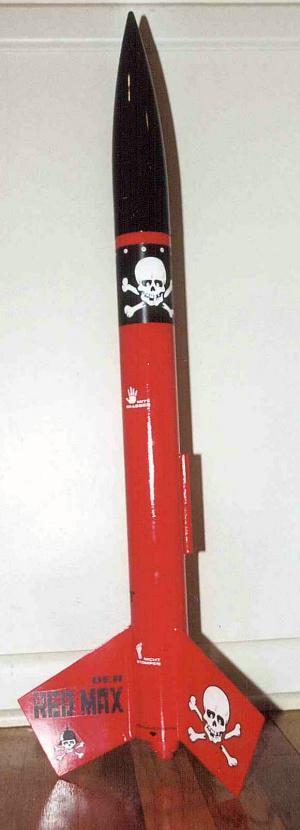 Brief:
Used a LOC/Precision Lil' Nuke kit to approximate a 1.38 upscale of the Estes
Der Big Red Max.
Modifications:
After losing a few auctions for a Der Red Max I decided to build my own. I
noticed on Jim Z's site that Estes had released a Der Big Red Max with an
18" length body tube. I figured I would try building an upscale version
using a LOC/Precision Lil' Nuke kit. I have always enjoyed the sturdiness of
the building components of LOC/Precision kits. The body tube would be a tad
short and the nose cone would not be exact but it would be close enough for
rock and roll.
I used a Lil' Nuke kit parts and new fins cut from 1/8" aircraft plywood. I followed the Lil' Nuke instructions to construct the motor mount and install the shock cord mount. The new fins were cut from 1/8" plywood using a pattern developed from the Jim Z web site. A razor saw and steel ruler worked well to cut the new fins with straight lines. Because the fins were quite a bit larger than the original fins I drilled small holes in the body tube for the 15 minute epoxy to seep into and make epoxy rivets.
Using sanding sealer I filled in the tube lines and coated the fins and sanded it down for priming. After a couple of coat of primer I was ready to paint.
I tried to find bright true red to help accentuate the cartoon appeal of the rocket. I decided on an apple red. Once the paint dried over night applied the decals I received from Papa Tango. Applying the decals was relatively easy but a word of caution: once you have the decal where you want it do NOT touch it. I managed to put a slight tear in one of my decals because I could not leave good enough alone. The tear was easily repaired with a black permanent marker. After the decals were dry I applied a couple of coats for Johnson Floor Finish.
Flight:
I launched the Der Big Red Max 1.38x at NARAM-43 on an AeroTech F20-7. I
friction-fitted the motor in place. The flight was nice and straight but the
delay was quite a bit longer than 7 seconds. I thought for sure it was going to
be a one-launch rocket but at about 100 ft the ejection charge decided to do
its thing and I got the rocket back in one piece without a zipper.
Summary:
I plan to use LOC/Precision kits again to upscale some of my favorite Estes
kits. The product was pretty easy to complete and results turned out well. I
received many positive comments at NARAM.
Browse our database of about 4,300 reviews of rocketry kits and other products.
Sponsored Ads


|
|